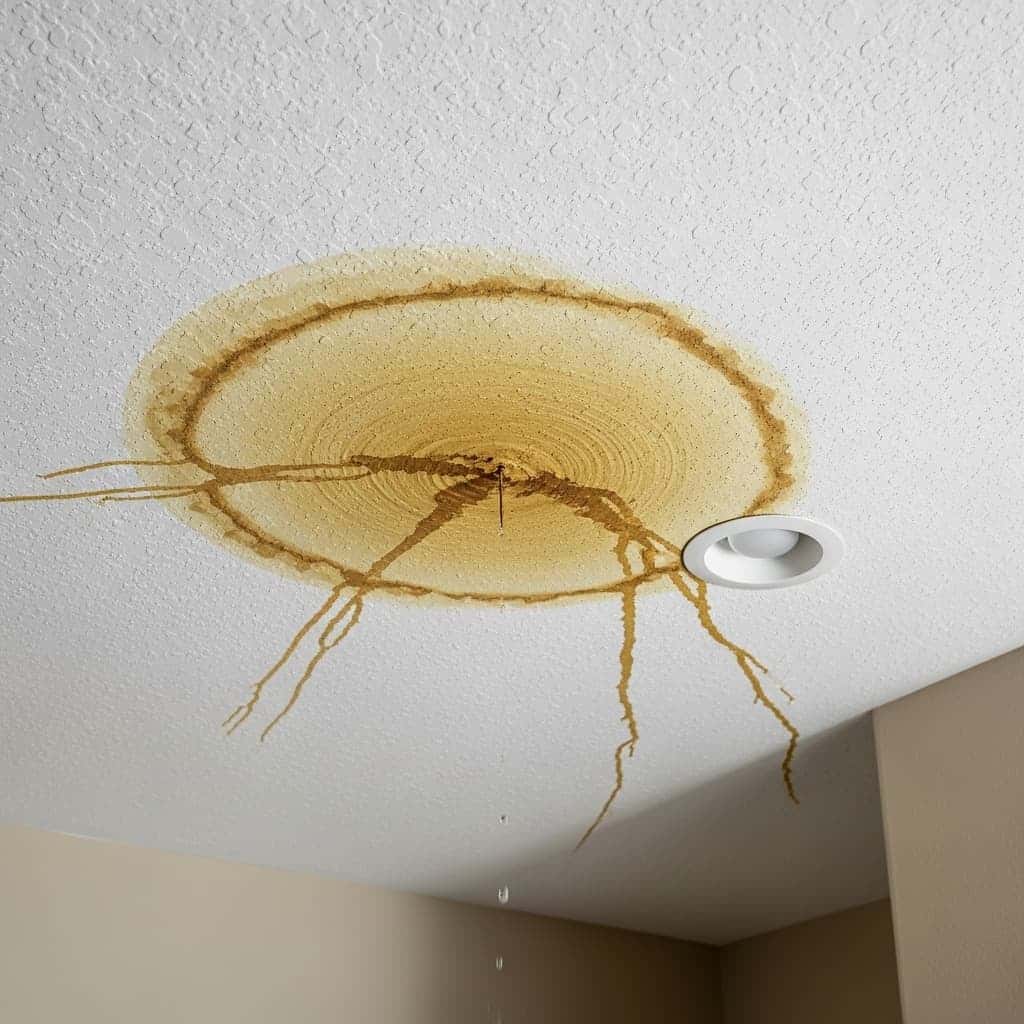
Water dripping through your ceiling is never a welcome sight. If you need to fix a roof leak from inside right now, you're in the right place. This emergency guide will walk you through exactly what to do to stop water damage and protect your home until professional help arrives.
While fixing a roof leak from inside is a temporary solution, these steps can prevent thousands of dollars in water damage to your ceilings, walls, and belongings. Let's get started with the immediate actions you need to take.
Critical Safety Warnings - Read First
- Never walk on a wet or damaged roof - Work from inside only during active leaks
- Turn off electricity to any rooms with active leaks - Water and electricity don't mix
- Use a sturdy ladder with someone spotting you - Falls are the #1 roofing injury according to OSHA ladder safety guidelines
- Watch for ceiling collapse - If you see sagging or bulging, evacuate immediately and call professionals
7 Emergency Steps to Fix a Roof Leak From Inside
When you discover an active roof leak, time is critical. Follow these emergency roof repair steps in order to minimize water damage and create a temporary fix until professional roofers can perform a permanent repair.
Step 1: Contain the Water Immediately
First, stop water from spreading. Place buckets, trash cans, or any waterproof containers directly under all drip points. Put towels or plastic sheeting around the containers to catch splashes. This is your first line of defense in water damage prevention.
If water is pooling in your ceiling (creating a bulge), carefully puncture the lowest point with a screwdriver to create a controlled drain point. This prevents a larger ceiling collapse. Place your largest container underneath before puncturing.
Step 2: Move Valuables and Furniture
Quickly move furniture, electronics, and valuables away from the leak area. Cover anything you can't move with plastic sheeting or tarps. Roll up carpets and rugs to prevent water absorption and mold growth.
Step 3: Locate the Leak Source (Roof Leak Detection)
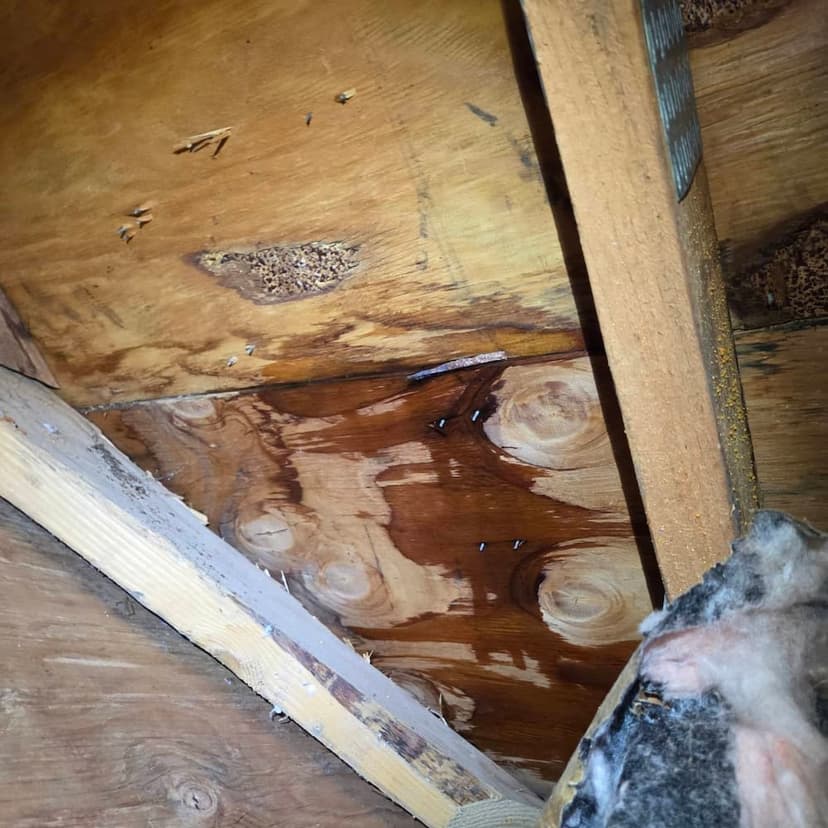
The hardest part of fixing a roof leak from inside is finding where water is actually entering. Water travels along rafters and roof decking before dripping down, so the wet spot on your ceiling is rarely directly below the roof penetration point.
How to find the source:
- Go into your attic with a flashlight during the rain if safe to do so
- Look for water trails, dark stains, or wet insulation on the underside of the roof deck
- Follow the water trail upward and toward the roof peak - the entry point is usually higher than the drip point
- Check around roof penetrations: chimneys, vents, skylights, and valleys between roof sections
Step 4: Apply a Temporary Roof Patch From Inside
Once you've found the leak source in your attic, you can create a temporary roof patch from the inside. This won't be permanent, but it will stop the immediate water intrusion.
Method 1 - Roofing Cement (Best for small holes):
- Dry the area around the leak as much as possible with towels
- Apply roofing cement or tar generously around and over the leak point on the underside of the roof deck
- Press a piece of plywood (6-12 inches square) into the cement to create a seal
Method 2 - Tarp and Boards (Best for larger areas):
- Spread a plastic tarp or heavy-duty plastic sheeting over the leak area from inside the attic
- Secure it with 2x4 boards placed across rafters, using screws if possible (not into wet wood)
- Make sure the tarp extends at least 4 feet beyond the leak in all directions to catch any water that travels along the underside
Step 5: Document Everything for Insurance
Before you clean up, document all damage for your insurance claim:
- Take photos and videos of the ceiling damage, wet areas, and the leak source in the attic
- Photograph any damaged belongings or furniture
- Note the date, time, and weather conditions
- Keep receipts for any materials you purchase for the temporary roof patch
Step 6: Dry Out Affected Areas
Once the leak is temporarily stopped, begin drying to prevent mold growth:
- Use fans to increase air circulation in affected rooms
- Run dehumidifiers if you have them
- Remove wet insulation from the attic (it won't dry properly and will harbor mold)
- Monitor for the next 48-72 hours for any signs of mold (musty smell, dark spots)
Step 7: Call Professional Roofers
Your temporary fix is just that - temporary. To truly fix a roof leak from inside is only a stopgap measure. You need professional emergency roof repair to address the underlying problem and prevent it from happening again.
Professional roofers will inspect from the outside, identify the root cause (damaged shingles, failed flashing, etc.), and make permanent repairs that will protect your home for years to come.
Tools and Materials You Need for Indoor Roof Leak Repair
Most homeowners already have these items or can pick them up quickly at a hardware store. Having these ready will help you fix a roof leak from inside faster and more effectively.
Essential Tools
- Sturdy ladder (A-frame for attic access)
- Flashlight or headlamp
- Screwdriver or utility knife
- Hammer and nails or staple gun
- Putty knife or trowel
- Measuring tape
Materials Needed
- Buckets and containers (various sizes)
- Heavy-duty plastic tarp or sheeting
- Roofing cement or tar
- Plywood pieces (various sizes)
- 2x4 lumber boards
- Towels and absorbent rags
- Heavy-duty duct tape

When to Call a Professional Roofer
While knowing how to fix a roof leak from inside is valuable for emergency situations, there are times when you should skip the DIY approach and call in the professionals immediately. Your safety and your home's structural integrity are worth it.
Call Professionals Immediately If:
- Multiple leaks or large wet areas - This indicates widespread roof damage
- Sagging or bulging ceiling - Structural damage is imminent
- You can't safely access your attic - Don't risk injury
- The leak is near electrical fixtures - Water and electricity create serious hazards
- You see signs of mold growth - Black, green, or white fuzzy spots indicate moisture has been present for a while
- Your roof is over 20 years old - The leak may be a symptom of a roof that needs replacement
- The temporary fix didn't stop the leak - The problem is beyond DIY repair

Need Emergency Roof Repair?
Our team provides rapid response for emergency roof repair throughout Clark County and surrounding areas. We understand that roof leaks don't wait for business hours.
Licensed, insured, and experienced with all types of emergency roofing situations - from minor leaks to storm damage. We'll assess the damage, provide honest recommendations, and get your roof watertight fast.
Preventing Water Damage While Fixing the Leak
Water damage prevention is just as important as stopping the leak itself. Water can cause extensive structural damage, ruin insulation, promote mold growth, and destroy ceilings and walls if not properly contained and dried.
Critical Water Damage Prevention Steps:
- Act fast - Every minute counts. Water damage accelerates exponentially over time
- Create drainage points - Don't let water pool in your ceiling. Controlled drainage into buckets prevents structural damage
- Remove wet materials - Wet insulation, drywall, and carpeting won't dry properly and will harbor mold
- Increase ventilation - Open windows and run fans to promote drying
- Monitor for 72 hours - Even after the leak stops, hidden moisture can cause problems. Check daily for musty smells or new stains
- Consider professional water damage restoration - For extensive leaks, professional drying equipment can prevent mold and structural issues
What NOT to Do When Fixing a Roof Leak From Inside
Well-meaning homeowners sometimes make roof leaks worse by taking the wrong approach. Avoid these common mistakes when you attempt to fix a roof leak from inside your home.
DON'T Do These Things
- Go on the roof during rain - Slippery surfaces cause falls. Wait for dry weather
- Ignore electrical hazards - Turn off power to affected areas immediately
- Use inadequate ladder support - Falls are the #1 roofing injury. Use proper equipment
- Delay calling professionals - Temporary fixes are just that. Schedule permanent repairs quickly
- Leave wet insulation in place - It won't dry and will grow mold. Remove and replace it
DO These Things Instead
- Work from inside during active leaks - Safer and often just as effective temporarily
- Shut off electricity to wet areas - Safety first, always
- Use proper ladder techniques - Follow OSHA ladder safety guidelines
- Document everything for insurance - Photos and receipts help your claim
- Start drying immediately - Run fans, use dehumidifiers, remove wet materials
Long-Term Solutions: Permanent Roof Leak Repair
Once you've successfully stopped the immediate emergency by fixing your roof leak from inside, it's time to think about permanent solutions. According to the National Roofing Contractors Association, proper roof maintenance and timely repairs can extend your roof's life by 10-15 years.
Professional Permanent Repair Options
| Repair Type | Best For | What's Involved |
|---|---|---|
| Shingle Replacement | Missing, cracked, or damaged shingles | Replace affected shingles and re-seal area |
| Flashing Repair | Leaks around chimneys, vents, skylights | Remove old flashing, install new waterproof flashing |
| Valley Repair | Leaks where two roof planes meet | Re-install valley metal or shingles with proper overlap |
| Roof Deck Repair | Water-damaged or rotted plywood underneath | Remove damaged sections, replace with new plywood |
| Full Roof Replacement | Multiple leaks, old roof (20+ years), widespread damage | Complete tear-off and new roofing system installation |
A licensed roofing contractor will inspect your roof, identify the root cause of the leak, and recommend the most cost-effective permanent solution. For comprehensive professional roof repair, Gold Shield Roofing And Gutters provides free inspections and honest assessments.
Prevent Future Roof Leaks
The best way to avoid having to fix a roof leak from inside is to prevent leaks in the first place. Here's what roofing professionals recommend:
- Annual roof inspections - Catch small problems before they become big leaks
- Regular gutter cleaning - Clogged gutters cause water to back up under shingles
- Trim overhanging branches - Prevents physical damage and keeps debris off the roof
- Proper attic ventilation - Reduces condensation and extends shingle life
- Prompt repairs - Fix small issues before weather events turn them into emergencies
Don't Wait - Get Professional Roof Repair Today
You've learned how to fix a roof leak from inside as an emergency measure. Now it's time for the permanent solution. Gold Shield Roofing And Gutters provides expert roof repair, replacement, and maintenance throughout Clark County and surrounding areas.
Licensed • Insured • 50-Year Warranties Available